Eggless chocolate mousse

Image


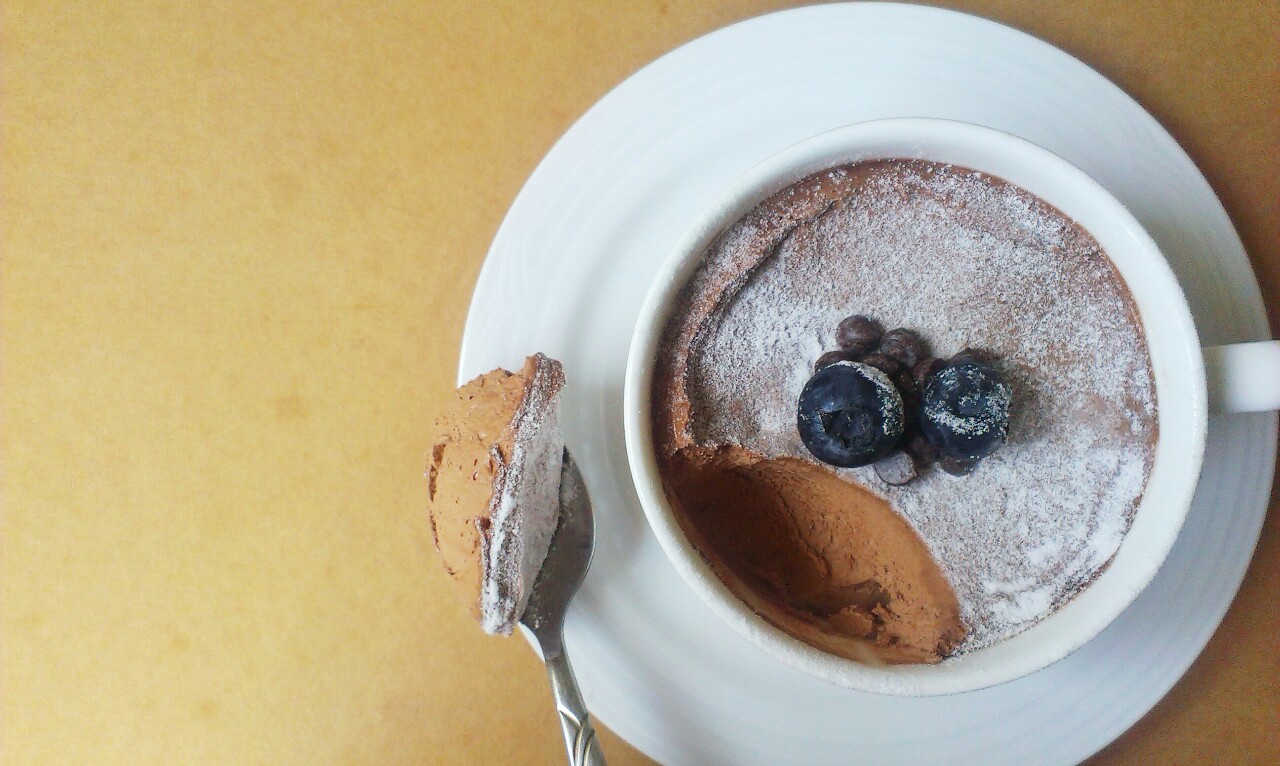
Chocolate mousse is really versatile. The velvety texture of the mousse allows easy manipulation, and just by playing around with the chilling time, you can achieve a soft or firm mousse. You can choose to eat it on its own, add a thin layer of it in between two chocolate cakes or you can even use it to frost cupcakes if you wish. 

This mousse recipe contains no eggs to minimize any complications and discard the fear of consuming raw eggs. This recipe’s ingredients is the same if you were to make a ganache, the only difference is the way the chocolate and the cream is combined. Also, some people add a tiny bit of espresso powder to enhance the chocolate taste. I however, dislike coffee and its strong taste so I just went without the espresso powder.


Yields: 4-5 cups (estimated)

 200ml whipping cream/heavy cream

100g Valrhona or good quality dark chocolate (75% and above)

Method:

  1. Melt the chocolate with a table spoon of heavy/whipping cream by double boiling or in the microwave.
  2. Whip cream until firm stiff peaks. (Tip: Put mixing bowl and balloon whisk in the freezer and take out only right before whipping the cream. This allows the cream to turn in to stiff peaks faster and hold better.)
  3. Add cooled melted chocolate in to the whipped cream and fold in until chocolate is well combined,
  4. Spoon the mousse in to serving cups and leave to chill in the refrigerator for at least 4 hours or over night.

Snowskin Mooncakes

In the spirit of the Mid-Autumn festival, I would like to share yet another non-bake recipe. Snowskin moon cakes are non-bake, sweeter and definitely a contrast from the traditional salty-sweet moon cakes. However, are not favorited by many for its slight raw-flour taste. They come in many different flavours and I love them to death!!!

Also I have an announcement to make about a couple changes you might see on the blog and something about opening my mail for cake orders. So please stick with me to the end of the post if you’d like to hear more about these changes, thank you :))

Image


Ingredients:

(Skin)

115g cooked gluttonous rice flour (Kao fen)

85g Hong Kong flour

100g Icing

Essence (Depending on the flavor of your moon cakes)

80g Shortening


(Filling)

1kg Moon cake paste (Red Bean, Lotus, Green Tea)


Method:

  1. Steam Hong Kong flour in a covered bowl for 10-15 minutes.
  2. Sieve icing sugar, gluttonous flour and Hong Kong flour in to a big bowl.
  3. Combine shortening and essence and add water (to your discretion) until mixture resembles a bread-crumb like texture
  4. Mix everything until it comes together to pliable dough.
  5. Divide the skin’s dough and the paste equally into approximately 60g each and roll in to a ball.
  6. Roll the balls out to a disc and add in the filling to the center. (Be careful not to roll out the skins too thinly or thickly)
  7. Wrap skin around filling and seal tightly making sure there are no empty patches where the filling shows.
  8. Press in to dusted moon cake mould and refrigerate for at least 6 hours before serving.

Alright the recipe part is done. I would like you guys to know that towards the end of the year, I might be changing the contents of my blog a little bit. I will shift my focus from creating and writing up recipes to decorating and designing of the cakes. More of how-to’s and failed experimenting (if any). This would mean that the cakes I use would probably from cake mixes to save time and mess. Not to fret, original recipes will still be shared on the blog.

Also, I will be starting to take cake orders from November onwards. In terms of how you’d like the cake to be, I would never put a specific limitation on my ability and what I cannot produce. I’d take it as a healthy challenge to push my barriers and test my decorating skills. Orders are open for within Singapore only (I am aware that most of my readers are Europeans) so feel free to drop me an email at: cookforme@live.com 

That is all I have today, till next time foodies! 


Churros!

Wow, I have been away for a little too long haven’t I.
Anyway my oven is broken and I am unable to bake anything in it. I have a small toaster oven but that’s pretty redundant, I can probably only use it to grill small portions of meat.
But any way, I decided to make churros today since I didn’t need to bake anything in the recipe.
Churros are basically fried choux pastry coated in cinammon sugar and usually served with chocolate dippings. Bla bla bla, I should stop blabbering and give you the recipe.
Here goes!

image

image

Serves 1-2
Ingredients:
30g salted butter
30g caster sugar
1 cup water
1 cup plain flour
50g plain chocolate
25ml cream

Mix brown sugar with a little bit of cinammon. Prepare enough for coating.

Method:
1. Melt butter in a saucepan over low heat with sugar.
2. Once completely melted, add in water and flour.
3. Stir until the mixture thickens and forms a dough.
4. Preheat oil for deep-frying
5. Pipe out the dough using an open star tip (I used Wilton’s 4B for a narrower and smaller portion) in to the hot oil and cut the end with scissors to discontinue each churro.
6. Deep fry until golden brown.
7. Coat each churro with cinammon sugar.
8. Serve churros with melted chocolate with cream.

Alright, till next time! Hopefully my oven is still able to be fixed and use.

cookforme@live.com
@thenavycat (instagram)

3-in-1 sugar rush!

image
image

So about a month ago, I had an idea of a cake that was really mouth-watering. To me, at least. And since then I have been planning, researching, experimenting before coming up with an ultimate recipe that will impress, de-stress and be a success.

The recipe is a combination of 3 recipes. It sounds like a hassle, and honestly it kind of is to me. But with a good management of time and dovetailing, you won’t  find it too much of a hassle. It took me a total of 5 hours from start to finish including the setting of cakes and decorating it. Sounds like a lot of time but it might be because I made two 6″ cakes an had a couple of screw ups during the process. But from my mistakes I am able to share a better recipe. But the end product is going to be so worth it, the contrasting textures of each layers that just come together nicely in your mouth is so so satisfying. Without further a do, (brace yourselves, its going to be a long list of recipes and how-to’s) here is the recipe for a Cookie dough vanilla and fudge brownie cake.

Ingredients:

Brownie mix:
200g caster sugar
185g soft butter
190g dark coverture chocolate
1 teaspoon vanilla extract
3 large eggs
110g plain flour

Vanilla cake mix:
200g sugar
120g butter
2 eggs
1 teaspoon vanilla extract
180g self-rising flour
½ cup milk

Cookie dough:
170g butter, melted
165g light brown sugar
3 tablespoons caster sugar
¼ cup milk
1 teaspoon vanilla extract
Chocolate chips (desired amount)

Decorating:

500ml whipping cream
150g dark chocolate (to melt)

Method:

  1. Begin with the brownie mix by melting the chocolate, butter and sugar in a big bowl over a double boiler.
  2. Once mixture is well incorporated, fold in the flour and the eggs once the temperature has cooled slightly(to prevent scrambling)
  3. Bake in a preheated oven at 180°C for 30 minutes or until a toothpick inserted comes out clean.
  4. In a mixer, cream butter and sugar for the vanilla cake until light and fluffy.
  5. Add eggs one at a time and add in vanilla extract.
  6. Add in flour in separate additions and beat on low.
  7.  Slowly pour in milk while mixer is on low speed until it reaches a wet batter consistency
  8. Bake in the oven at the same temperature.
  9. For the cookie dough: In a large bowl, add melted butter and vanilla to sugar and stir well, add in flour and milk until it reaches a desired cookie dough consistency.
  10. Allow cakes to completely chill.
  11. In the same pan used to bake the cakes, layer cling wrap in the pan and press cookie dough down in to the pan and chill in the fridge.
  12. In the meantime, whip up the whip cream until stiff peak and spoon in to
  13. Once all cakes and cookie dough are chilled, pipe a layer of whipped cream on and lightly spread out lightly.
  14. Stack the cooled layer over the cookie dough that is still in its pan and pipe a layer of whipped cream again.
  15. Stack over the brownie and gently press down and let it set in the fridge or freezer for an hour at least.
  16. Once set, cover cake pan with a cake board and overturn.
  17. Gently remove cake pan and cling wrap and chill in freezer for a further 15 minutes.
  18. Frost exterior with whipped cream and pour over melted chocolate(allow it to drip by the sides)

Finally, allow the cake to rest and chill in the fridge for at least 2 hours before serving! Good luck on this amazing cake and enjoy, ciao!

Pangasius quiche

I apologise for not posting for almost three weeks! I won’t give you any bullshit as to why I was away for so long, let me just be frank. After my exams, I was really lazy and I didn’t know what to cook or bake.

So anyway, today I felt the need to upload the blog after so long.. Pangasius hypophthalmus is a white fish that I happen to have lying around and so I decided to make a quiche out of it. I would very much prefer using salmon if I had some, the flaky texture and rich taste from its oily flesh appeals to me much more. The crust is made the same way as the crust for lemon meringue pie recipe. Basically the ratio of fat to flour for a short crust pastry is 1:2. So depending on how much crust you need, you can estimate accordingly.  Image

Image

INGREDIENTS:

  • 100g Pangasius fish
  • 1 small onion
  • 2 cloves of garlic
  • Black pepper, dried herbs of your choice, salt
  • 2 eggs
  • 1 tablespoon milk
  • Shredded cheddar cheese (optional)
  • 5 cherry tomatoes, halved
  • 1 small lime or a tablespoon of fresh lemon juice
  • 50g butter
  • 100g plain flour
  • Baking weights or beans/rice/dried pasta

The crust:

  1. Combine flour and butter in a bowl
  2. Rub flour in to butter until mixture represents breadcrumbs
  3. Add water until mixture comes together in a dough
  4. Leave to rest in the fridge for 30mins
  5. Blind bake for 15 minutes and remove weights and bake for another 10 minutes at 200 degree Celsius

The filling:

  1. Dice the fish and marinate it in dried herbs(I used thyme and basil) and pepper with a squeeze of lime to reduce the fishy smell and taste
  2. Roughly mince the onion and the garlic
  3. Heat a small wok with 2-3 tablespoons of oil and fry the onions followed by the garlic.
  4. Add the contents of the wok with the diced raw fish in a bowl to allow the flavour of the garlic and the onions to incorporate the flavour in to the fish
  5. in a separate bowl, lightly whisk eggs and milk together
  6. Put the filling together by adding the fish in the crust, followed by the tomatoes, cheese and finally, pouring over the egg mixture.
  7. Garnish with dried herbs and bake in the oven at 200 degree Celsius for 25-30 minutes or until filling has set
  8. Set aside to cool, serve.

That’s all I have for you today! I’ll be back with another recipe as soon as i can think of one, I was thinking of doing a chocolate and Nutella cake but I just made a chocolate cake in my S’mores post. Hmmmmm… Alright, til next time!

S’mores cake.

ImageImageInitially I wasn’t intending on updating my blog until after exams, but I felt that I should make something and talk about it since Mother’s day is just around the corner. I found this recipe of a super easy chocolate cake on Hershey’s website which I will put a link to in a second. So basically my version of the s’mores cake is just a basic chocolate cake with ganache in the centre topped with toasted meringue, more chocolate ganache and Graham crackers. 

Without further ado here’s the recipe: 

Chocolate cake: https://www.hersheys.com/recipes/recipe-details.aspx?id=184

Meringue:

3 egg whites, 120g sugar

Chocolate ganache:

150g dark semi-sweet chocolate, 150 ml whipping cream


METHOD:

  1.  Divide cake in to half after cooled using instructions from the Hershey’s website. 
  2. Make ganache by chopping the chocolate in to small pieces and pouring over heated cream to melt it.
  3. Set ganache in the fridge to thicken and cool.
  4. In the meantime, prepare meringue by beating it with an electric mixer or by hand.
  5. Gradually add in the sugar when it is frothy and beat until stiff peaks and glossy
  6. Once ganache has cooled, spread over chocolate ganache in the centre and laying over the top layer of cake. 
  7. Spread meringue and make spike effects or pipe it on the top. Toast with blow torch.
  8. Crush Graham crackers for garnishing on the top and viola! Ready to serve 🙂

Instead of using a meringue topping, you can use marshmallow fluff of marshmallows themselves. I had neither, so I went with a toasted meringue which tastes the same.

Alright that’s all for today! Good luck! 

Lemon meringue pie

I tried making a lemon meringue pie for the first time after watching Sorted Food’s version on YouTube.

I used their recipe for the curd and meringue but I soon realized that it was too sweet for me and some of my friends. Also, I should have used unsalted butter for the curd which wasn’t mentioned on their website. With salted butter, I felt that there was too much going on. salty, sweet, sour, tangy. Hmm. So I switched it up and modified everything and here’s my version of a lemon meringue pie.

20130430-101939.jpg

LEMON MERINGUE PIE

Serves 6-8

For the crust (short crust pastry recipe):

100g cold cubed butter

200g plain flour

Cold water


For the curd:

2 large eggs

2 large lemons

120g caster sugar

100g unsalted butter

1 tablespoon corn flour


For the meringue:

3 egg whites

120g caster sugar


Method:

  1. In a bowl with the flour and cold butter, rub in the butter in to the flour until mixture represents breadcrumbs.
  2. Add enough cold water for the dough to come together. Leave aside to rest.
  3. Meanwhile, preheat oven to 180°C and prepare curd.
  4. In a saucepan, grate and juice 2 lemons and add in all the other ingredients for the curd.
  5. Keep stirring until everything is well combined and the mixture has thickened.
  6. Leave mixture to cool. Roll out the dough and cover a pie plate. Trim off any excess with a knife.
  7. Blind bake for 8-10 minutes and bake normally for another 5 minutes
  8. Once crust is out and has had time to cool, pour in curd and refrigerate until set.
  9. Meanwhile, prepare the meringue by whipping it up either by hand or using a mixer.
  10. Gradually pour in sugar bit by bit between when it is frothy to stiff peaks and glossy.
  11. Pipe on well set pie and toast it with a blow torch.

That’s all for today! Good luck if you’re going to try this out, ciao!

Shepherd’s pie.

Hello, sorry if I haven’t been updating the blog as much as I used to. I’m trying to commit at least one post a week. Its been super busy for me and I am trying my best to update my blog as much as I can.

So last week, I made shepherd’s pie for the first time. Shepherd’s pie is basically a layer of ground beef and vegetables topped with a layer of creamy whipped potatoes and baked in the oven until the potatoes form a crust. I have never eaten it or tried cooking it, so this would be my ultimate “virgin” attempt. It turned out better than I expected.

I didn’t follow a recipe for this, I just figured out that Shepherds pie only needed you to prepare some whipped potatoes, fry the ground beef with some diced onions and carrots(or veggies of your choice) and with some meat stock. But I made up a recipe for it anyway.

20130423-131316.jpg
Serves 1-2
INGREDIENTS:
For the whipped potatoes
3 russet potatoes
1 tablespoon salted butter
5 tablespoon milk/cream
Salt and pepper to taste

For the filling
300g ground meat (I used beef)
200g meat stock (I used beef stock)
2 carrots, diced
3 cloves of garlic, minced
1 yellow onion, diced
Salt and pepper to taste
Oil to fry

METHOD
1. Boil the potatoes until it breaks apart when pierced through.
2. Sauté onions and garlic until fragrant.
3. Add in the carrots and fry to allow it to soften.
4. Add the ground beef and fry until beef turns from red to brown.
5. Add the beef stock and allow to simmer until stock thickens.
6. Drain the potatoes and mash them through a potato masher or fork.
7. Then add the milk/cream and butter and whip with a fork until smooth.
8. Arrange the meat in an oven-proof dish and spread the potatoes over it.

You can choose to pipe on the whipped potatoes or just spread it out with a spoon. I spread it out with a spoon and made grooves with a fork.

9. Bake in the oven until the potatoes turn golden brown.

I didn’t actually bake the pie until the potatoes turned brown, but that was because I couldn’t wait to dig in. Hehehe. Alright that’s all for now!

cookforme@live.com
Instagram: @thenavycat

Breakfast hassle

Breakfast. The most important meal of the day and also the most neglected one. Most of us would much prefer our beauty sleep over getting up extra early to prepare a meal.
But breakfast is really important as it gives us that morning boost we need (besides coffee). It keeps our energy level high and thus allowing us to concentrate better.
I hardly ever have the time for breakfast in the morning. So I prepare it the night before, heat it up before I leave home and eat while I cycle to my destination (not very safe, yes I know).
Recently I saw this video on YouTube by modernmom titled “Eggstatic Breakfast Sandwich”. And from that, I will share my written recipe for it. I didn’t follow the video exactly but it’s about 90% the same.
I will also pop a link to the video so you can watch it for yourselves.

20130416-122808.jpg
SERVES 1
Ingredients:
2 eggs
A quarter of a yellow onion
2 cloves of garlic
A handful of spinach
2 slices of cheddar cheese
2 slices of toast
1 tablespoon olive oil

Method:
1. In a non stick pan, sauté onions and garlic until tender.
2. Wilt the spinach with the onions and garlic.
3. Add in both eggs and combine the vegetables well.
4. When eggs are semi solid, (about 3 mins later) season with salt, pepper and your favorite herb(optional).
5. Mould your egg mixture in to a block for easier serving. Place a slice of cheese on top and allow it to melt.
6. Serve on toasts, enjoy!!
Click here for the video: Eggstatic Breakfast Sandwich

That’s all for today!

Food Studies.

I’m actually studying Food & Nutrition (F&N) and I have come to the point where I need to decide on what to cook for my practical exam. Sounds easy for someone who doesn’t study food. Here in Singapore, if you’re taking your F&N practical exam, you will be marked on the number of skills you show in your dishes and the methods of cooking you use. And above that, we’ll have to answer the question, modify the recipes to make it healthier.

So, if you’re in the same plight as me, not knowing what to cook for your exams, i do have a list of skills that i received from some random guy (probably god) which helped me a lot. 

SKILLS

Biscuits:

  • Rubbing in
  • Whisking
  • Creaming

Cakes:

  • Whisking
  • Creaming
  • All in one

Pastries:

  • Short crust (rubbing in)
  • Rough puff
  • Choux

Bread making:

  • Kneading

Knife skills:

  • Chopping
  • Cutting
  • Slicing
  • Dicing
  • Cubing
  • Julienne

Others:

  • Mashing
  • Shaping
  • Grinding
  • Mixing
  • Pounding

METHODS OF COOKING

Dry heat:

  • Baking
  • Grilling
  • Roasting

Moist heat:

  • Steaming
  • Boiling
  • Simmering

Hot fat/oil:

  • Deep fry
  • Stir fry
  • Pan fry
  • Shallow fry

Combination methods:

  • Stewing
  • Braising

I hope this helped you in a way or another if you’re in a similar situation as I am. Thank you for reading my blog, it makes me really happy to know that my blog is getting views. Alright, that’s all for today! xx